

Start with calibration
The right colour management process can be the difference between being certain of what the end results are going to be, and having to spend time fixing things in post production.
When we talk about colour management whether it is for photography or video it has got to start with calibrated monitors. Many people think about calibrating monitors for post production, once they are back from the shoot. But I rely heavily on monitors during production, in order to make sure that what I am seeing on set is as close as possible to what Ill see further along the pipeline. In order to have confidence in the colours I am capturing, it is vital that I calibrate our production monitors before we even shoot one frame.
I use the Atomos Shogun Inferno which, as well as being a high resolution, 10-bit monitor, is also a recorder that can hook up directly to my camera. This gives added benefits like colour fidelity and bit depth (the number of colours and shades that can be represented in the video signal), which is a good way to ensure that you get better quality digital negative right from the outset. Even if Im not using it to record, I can still check my exposure, colour balance and focus on the Infernos high-quality display. If it isnt correctly calibrated before we begin rolling, I cant be sure I can trust what Im seeing and I dont want to be in a position where I am looking at a monitor that is not giving a correct representation of what I am recording.
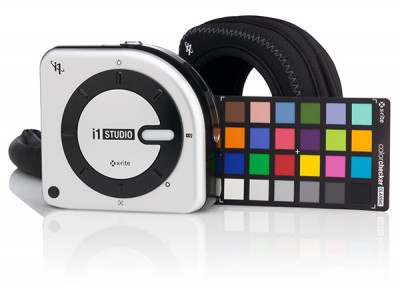
X-Rite has exclusively collaborated with Atomos so its i1Display Pro offers a simple way to calibrate Atomos monitors and its on my list of things to do before every shoot usually the night before, along with charging batteries and formatting media. It is a simple and quick task that gives you peace of mind, knowing that you can look at a screen and know its close to what you are going to end up with.
Set the record straight
In terms of actually recording, whether that is straight into the cameras or into the Atomos recorder, you need to ensure that white is white, black is black and grey is grey. In other words, white balance must be accurate, or itll be something that will need fixing in post production.
With most signals, as soon as you are making any changes, you are degrading the image (unless you are using a raw camera) so it makes sense to get this right first time.
The way that we ensure that is to use X-Rite ColorChecker targets, whether thats the ColorChecker Passport Video for shooting B-roll and close ups, or the larger version for interviews and wider shots. We use the grey side to white balance the camera, to ensure that everything is in alignment and if you take a reading from the grey, then you know that all the whites and blacks will slot into place based on the ambient colour temperature that you are in.
White balancing is a crucial step and it always amazes me how few people will take the time to do this properly.
Even if you manually white balance, there are inherent weaknesses or issues with the way that cameras interpret that information. Using the ColorChecker charts gives you a consistent reference point, which is very useful for ironing out those discrepancies. This is critical if you are using multiple cameras, as you can ensure all the images end up being consistent.
X-Rite ColorChecker targets also have large exposure chips, including a 90 percent white reflectance chip, which is very useful. Again, its a quick and simple way of ensuring that all your cameras are picking up the same colours, the same contrast and are as close to each other as they possibly can be.
Post works
Calibrated monitors are also a critical part of post production, so any reference monitors I use are calibrated with the X-Rite i1Display Pro. I have a three-display set-up in my home grading suite, a middle display which has my software user interface (I use DaVinci Resolve for colour grading), one to the left for all my scopes e.g. vectorscope, waveform monitor and parade that I use to analyse the signal and on the other side, I have my reference monitor that shows a full screen preview of my graded image.
Scopes are an invaluable tool for a colourist to use to help pull everything into place. They dont lie to you; they dont drift, they just analyse the signal coming through and tell you exactly what youve got. But, if youre working off a monitor that is not properly calibrated, there is always that doubt about how the final image is going look. You want to be able to trust your gut instinct, so being able to glance at your reference monitor and know its showing you an accurate image is crucial.
Shades of light
If you are using artificial light in-production, it is worth ensuring that they are of a certain quality to give good colour rendering. Some LED lights can give a green tint that makes skin tones appear sickly. Gels can be a good way of removing as much of that green colouring prior to post production as possible, for example a magenta gel will help to address this, balancing out the green to give a cleaner colour rendering.
Colour and Grey cards are an inexpensive but critical piece of kit for any kind of analysis whether that is of light sources or the camera itself. It helps you build up an idea of what that camera or light is actually doing. It is also really useful to film the chart and look at it under a vector scope, just to give you an idea of how your cameras handle different colours and light sources.
In a nutshell, you want to get the best possible image from the shoot so that you are only minimally fixing it in post production. Colour calibration is key to this.